|
Digital Image ResizingOne aspect of digital images which seems to cause a lot of confusion to beginners is the matter of image size. There are three basic measures of image size
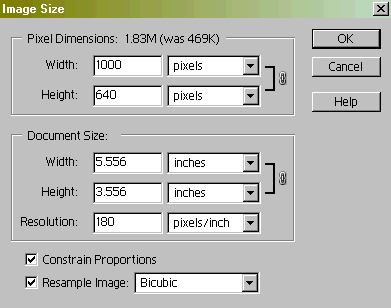
The confusion seems to arise because people aren't sure of how these are related. They wonder if ppi affects the size of the image you see on a monitor screen. We know that displays are measured in pixels (e.g. a 1024x1280 display), and that screens are a given width (e.g. 15"), it seems logical that the pixels/inch setting should affect the size of the displayed image. Logical maybe, but wrong. Although monitors do have a measurable figure for ppi (pixels per inch), the ppi information in an image is NOT used for monitor display in web browsers. Digital image files are "tagged" with other information. For example the width and height in pixels is in there, as is the resolution (ppi). Some image files also contain all sorts of information about the image, such as exposure data, focus data, flash data - and this is stored in what is referred to as the EXIF header. EXIF stands for Exchangeable Image File Format, and is a standard for storing interchange information in image files, especially those using JPEG compression. So how is this information used, and what uses it? PixelsWhen you display a digital image on a monitor using a web browser, the only thing that determines the size of the image is the width and height in pixels. All the other data contained in the image file including resolution (ppi data) is ignored. If your image is a 480Kbyte file which is 800 pixels wide by 600 pixels wide, it will display as a full screen image if you are using an 800x600 display. It doesn't matter if your ppi is set to 1 or 1000 This is 100% true as far as web display goes and as far as any monitor display goes - unless some software intervenes. For example the IE6 browser may take large images and resize them so they fit on the screen. However ppi is still ignored. A few page layout programs and image editors are optionally capable of taking ppi into account when displaying images. So I'll say this once again. The way you control how large an image appears on someone's monitor screen when viewing your images on the web is by changing the height and width in pixels If your original image is 1600x1200 pixels it will probably be too large to see all at once on 95% of the video monitors out there. It will also be slow to load since it will be a large file. If you want someone using an 800x600 display to be able to see your image clearly, you need to change the size to, say, 600x400 pixels (remember the browser window is smaller than the full monitor display). You change image size in software. All image editing programs can do this. It's called "resampling". If you make the image smaller it's often called "downsampling" or "downsizing". if you make it larger it may be called "upsampling" or "upsizing". See your image processing software manual for details on what options your software offers. For example here's a screen from PhotoShop (and PhotoShop Elements) which allows you to change the pixel width and height of the image.
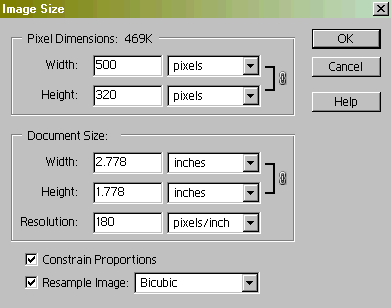
You can see here we are starting out with an image which is 1000 pixels wide and 640 pixels high. Let's assume we want people who still have 640x480 displays to be able to see all this image at one time. To do that we have to reduce the image size. Let's say we want to make it half as big, 500 pixels wide by 320 pixels high. What do we do? Well, we ignore what's in the document size box, since that ONLY affects the way the file will be printed. The data in the Pixel Dimensions box is all that counts as far as web display is concerned. So what we do is simply type "500" in the width field of the Pixel Dimensions box as shown below, with both the "constrain proportions" and "resample image" boxes checked
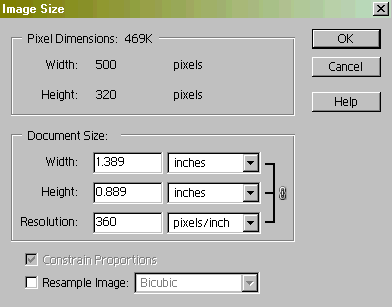
Note that since we had the "Constrain Proportions" box checked, changing the width also changed the height in correct proportion. Clicking on "OK" will resize the image to 500 x 320 pixels using a "bicubic" resampling algorithm. The "bicubic" algorithm usually gives the best results but takes most time. There are alternative resampling algorithms called "bilinear" and "nearest neighbor" which are faster but which might not give as good results. On a small file like this, speed doesn't matter, but if you're working on a 180MB file, it might. Resampling is the name for the process which figures out how best to subtract (or add) pixels when the number of pixels in the image is changed. Of course you can make images larger as well as smaller. You can take an original image which is 500 x 320 pixels and make it 2000 x 1280 pixels. The problem is that you have now created an image with an extra 1.92 million pixels which have to be made up by the software. The larger image will have no more real information in it than the original, so it won't look as sharp. If you must do this, the best way to do it is using bicubic resampling and to do it in small steps. By this I mean you may get a slightly better result by enlarging in 5 or 6 smaller steps than by enlarging in one big step. So for example you might change width (and height in proportion) in steps from 500 - 750 - 1000 -1500 -2000, rather than in one step from 500 - 2000. Sometimes you may see a small difference, sometimes you may not. Pixels per InchYou'll note that the width and height in the document size box have changed along with the number of pixels in the image. This makes sense because the resolution (pixels/inch) has not been changed. "Pixels per inch" and is almost exclusively used for printing, not video display. If you take an image that is 1000 pixels wide and 640 pixels high, and you print it with a ppi setting of 180 pixels per inch, the print will be 5.556 inches wide by 3.556 inches high. If you resample the image down to 500 pixels wide by 320 pixels wide and you keep the ppi setting at 180 ppi, the print (document size) will now be 2.778 inches wide by 1.778 inches high. You can, of course, change the ppi setting. 180 is probably as low as you want to go for quality images. For the very highest quality you might want to go to 360 ppi as shown below.
Note that the resample image box has been unchecked since we don't want to change the number of pixels in the image, just how those pixels are printed. Instead of printing 180 pixels to every inch, we now want to print 360 pixels to every inch. Obviously this will result in an image which is half the size (but with twice the linear pixel density). You will see the new print (document) size is now 1.389 inches wide by 0.889 inches high (pretty small!). What happens if you only have a 500 x 320 file, but you want a 10" x 6.4" print? Well, you either have to set the resolution to 50 ppi, or you have to set the resolution to something like 200 ppi and upsample the image by a factor of 4 (to 2000 x 1280 pixels). Either way image quality will suffer, showing you can't make good large prints from small image files. There are some programs (e.g. Genuine Fractals) which claim to be able to upsize with less quality loss. Sometimes they give results which are a little better than using bicubic upsampling in PhotoShop, sometimes they don't. Dots Per InchThere's another term, dpi, which is associated with printers. DPI stands for "dots per inch" and is a property of a printer and printer driver software, not a digital image. It's a measure of how finely spaced the droplets of ink can be in a print. However the number is a bit misleading since it's not always measured in the way you think it might be! Printer settings of 360dpi, 720dpi, 1440dpi and 2880dpi are often found. However the difference between them is subtle at best. Most people probably couldn't tell the difference and 360dpi usually looks great. Changing DPI does not change the size of the print. ppi controls that. dpi controls print quality (though as I said, over 360dpi you typically don't see much change). What if you don't have PhotoShop?Not everyone can afford PhotoShop - and indeed not everyone needs or wants it. Just about every image editor ever made allows you to adjust the size of images and just about every camera or scanner sold comes with one or other of them. They all have different menus so it's not possible to give definative instructions for every single program. If for some reason you don't have any image editing software, get some! You certainly don't need to spend $600 on PhotoShop CS of course. For around $100 you can get JASC Paint Shop Pro v.9 which is an excellent image editor with just about every function that the average amateur needs. If you're really cheap you can get several free image editors. They don't have all the features of the commercial software packages, but they have enough to still be useful. Check out PhotoFiltre, Irfanview and GIMP for three of the better freeware programs.
© Copyright Bob Atkins All Rights Reserved |
|||||||||||||||||||||||||||
|
||||||||||||||||||||||||||||


