

LensAlign and FocusTune Review
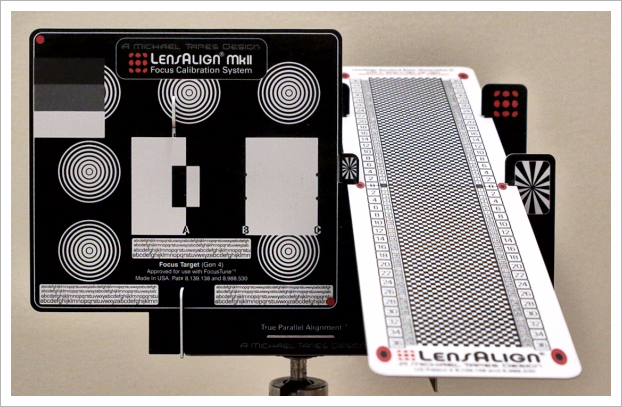
First let's define what LensAlign and FocusTune are and aren't.
What they are: LensAlign is a target system which is designed to enable you to tell if your lens is focusing where it should, or if it's focusing in front of or behind that point (front focusing or back focusing). The clever feature of the LensAlign target is that it has a built in system for making sure that the taget is positioned parallel to the plane of the sensor, a requirement for accurate and repeatable results. You can use the LensAlign target system with or without the FocusTune software which I will describe next.
The FocusTune software enables semi-automatic measurement of two things. First it can indicate whether the plane of maximum sharpness (focus point) lies in front of or behind the target (or if it's right on the target). Many cameras allow "focus microadjustment" of focus, so if a lens consistently focuses in front of or behind the desired focus point, small adjustments can be made to shift the focus to the correct position. If you take multiple shots of the LensAlign target using multiple different focus microadjustment settings, FocusTune can analyze those images and create a plot showing how the point of focus changes with each setting, so you can see which setting gives you the most accurate focus. The second thing that FocusTune can do, once you have optimized the focus microadjustment, is to show you how sharpness changes with aperture, so you can see what the sharpest aperture of your lens is.
What FocusTune can't do is allow you to compare lenses. The readings for front/back focus and lens sharpness are not given in absolute terms. They are relative measurements within a set. A set being defined as a series of consecutive shots taken with the same camera and lens of the same target at the same distance in the same lighting without disturbing the alignment in any way. You can change the camera settings (focus microadjustment setting, aperture setting) as long as you don't move the lens. So you can't tell if your 100/2.8 is sharper than your 50/1.8 and you can't tell if one 200mm lens shows nore front/back focus than a second sample. The measurements presented by the software are relative, not absolute
However note that relative measurements are all you need if you are optimizing the performance of a lens. For that lens you want to set focus microadjustment so that it focuses on the target, not behind it or in front of it, and you want to know what the sharpest aperture is. LensAlign and FocusTune will tell you both of these things.
While you could just use the LensAlign target and, by manual inspection of the resulting images, estimate how focus position changed with focus microadjustment setting and how sharpness changed with aperture, using the FocusTune software makes this process MUCH easier and probably much more accurate. I'd certainly recommend getting both if you are serious about optimizing lens performance.
LensAlign - the details
The LensAlign unit consist of three basic units:
- A focusing and resolution target
- A tilted focus indicator rail
- A mechanical assembly which keeps parts 1 and 2 in alignment
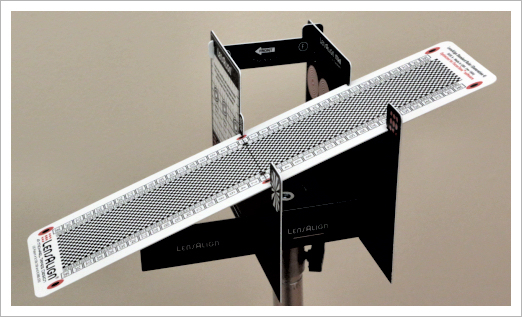
The tilted focus rail snaps into the assembly and is well supported so that it stays flat. It's tilted at an angle of about 20 degrees to the horizontal and extends about 4.5" in front of and behind the focusing chart and so is good for up to about 4.5" of front or back focus. A longer rail (30") is available for use under conditions where there is a large depth of field.
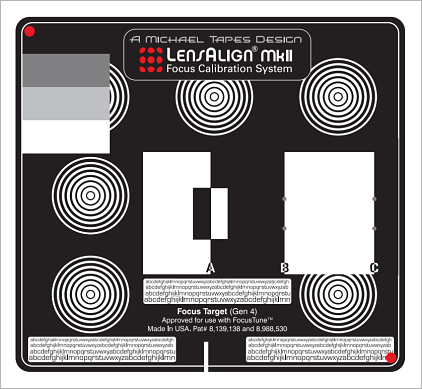
The focusing chart (shown above) has various patterns and text, but the heard of it is in the center and consists of a set of vertical black and white segments which are the primary focusing areas and which are used to determine sharpness by the FocusTune software. Note that there have been a number of different targets and various images on the various websites show different targets, which can be somewhat confusing (at least to me). The target shown above is the current (02/16) "Gen 4" version.
I'd suggest the best way to get a feel for what LensAlign and FocusTune do and how they go it is to watch the series of YouTube videos (see link below).
Here are a few links that might be useful:
- LensAlign and FocusView Videos
- LensAlign and FocusTune help and support
- PDF of assembly instructions for LensAlign
FocusTune - The details
The FocusTune software is downloaded from the website but requires the purchase of a registration key to operate. There's no "hard copy" or boxed version with a disk and instructions. Installation of the downloaded file is automatic and went smoothly. There is no manual as such and there's no help file that installs with the software. For assistance you have to visit the links given above and watch the relevant YouTube videos and/or read the help and support pages. While these are good, I think an actual manual and/or integrated "help" file would be even better and make the software easier to understand and use.
Using the LensAlign and FocusTune
It's recommended that the LensAlign be placed at a distance of about 25 focal lengths from the camera This is about 1" for every mm, or 2.5m (8.2ft) for every 100mm of focal length, so the distance for a 50mm lens would be around 50" and the distance for a 500mm lens would be 500" or 42ft). The exact distance isn't critical and doesn't affect accuracy but sticking with something close to the recommended value is a good idea. If the distance is too large (>>50x the focal length), the targets in the image will be very small and that could affect focus accuracy and the ability of the software to extract accurate data. If the target is too close, additional aberrations my come into play and values for sharpness and focus accuracy at very close distances can be different from those at more normally used shooting distance. So for "normal" testing, a distance of between 25 and 50 focal lengths is recommended. Obviously if you want to test the operation of a macro lens at lose distances, then that's what you should measure, but that's a special case. I won't go through the alignment process in detail, but it basically involved positioning the camera a certain distance apart (around 25x the focal length of the lens) and turning the LensAlign so that the plane of the target is parallel to the plane of the image sensor. Alignment ports in the front and rear walls of the Lensalign unit,along with alignment graphics make this fairly easy to do but somewhat more difficult to describe! The best way to find whats involved is to view the Alignment Video. One you've done it once things become clear and it only takes a minute or two to get everything in alignment.
To check for front or back focus you then take a series of shots, maybe 10 shots, allowing the camera to refocus each time by manually getting the lens out of focus and allowing the AF system to refocus. It's important that the target be well illuminated (AF works better in bright light) and the alignment of the camera not be disturbed. Using a remote release and mirror lock up or a delay also helps make sure the that artifacts due to camera movement don't cause problems.
If you don't have FocusTune software, you then look at each image and see where the sharpest point is on the sloping rule. If the lens if focusing properly it should be close to the center of the scale. Since focusing will never be 100% consistent, there will be a small variation from shot to shot, but on average you want the sharpest region to the the center of the sloping scale. If you have the FocusTune software, visual inspection is made a little easier bythe projection of a red "focus mask" on the image, showing the areas which are "in focus" as shown below.
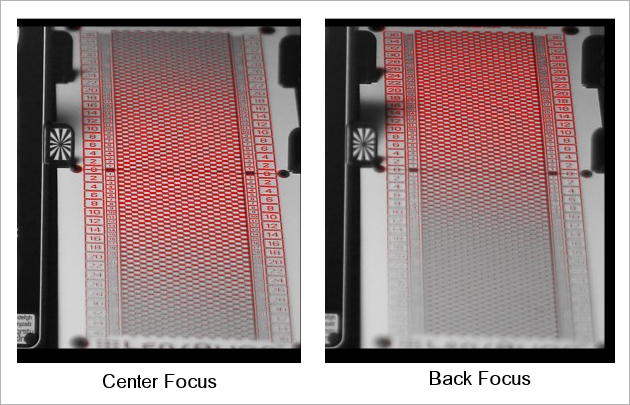
You will now know if your lens is front or back focusing, but if that's the case you now need to adjust it. Most cameras with focus microadjustment make that adjustment via the camera's menu system. In the case of Canon DSLRs, focus adjustments from +20 to -20 "steps" can be made. Each step is equivalent to 1/8 of the depth of field. These are very fine steps. The accuracy of AF for Canon for normal precision is "within the depth of field" and for high precision (f2.8 lenses with high precision AF sensors), it's within 1/3 of the depth of field. If the images are front focused the focus microadjustment should be +ve (+1 to +20). If the images are back focused the focus microadjustment should be -ve (-1 to -20).
To find the correct focus adjustment setting requires taking a series of shots at a variety of settings and figuring out which setting is best. You can do this manually, examining each image visually. The better option though is to use the FocusTune software. If you take a series of shots at each of a number of focus microadjustment settings, say 5 shots at 0, +5, +10, +15 and +20 if your images are front focused, Focus tune will make a plot showing the focus position at each setting, as shown in the image below. This test was done with a Canon EF85/1.8 mounted on a Canon EOS 6D body
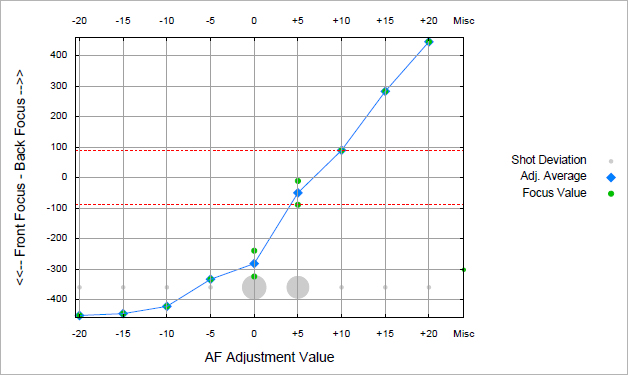
The best value for the focus microadjustment setting is where the curve crosses the "zero" line. You can see here that the best focus setting seems to be somewhere around +8, so we can do the tests again, this time at settings of +2, +4, +6, +8, +10 and +10 as shown below. The back/front focus axis has no units. It runs from +400 to -400 but what that means in terms of actual amount of focus shift isn't indicated. Based on my own measurements of the position of the sharpest zone on the slanted scale for this particular lens under the shooting conditions (distance, aperture) I was using, the range appeared to be approximately +/- 4.5 cm. FocusTune could (with knowledge of the slanted rule dimensions) calculate absolute values of front and rear focus, though that information isn't necessary in order to optimize focus. The meaning of the dotted red lines isn't 100% clear and I'm sure it's documented somewhere, but from what I can gather from watching the videos the points where the plot crosses the red line define the range over which the best focus adjustment setting is most likely to be found. I thought at first it might be some way of showing the depth of field of the lens, but it isn't.
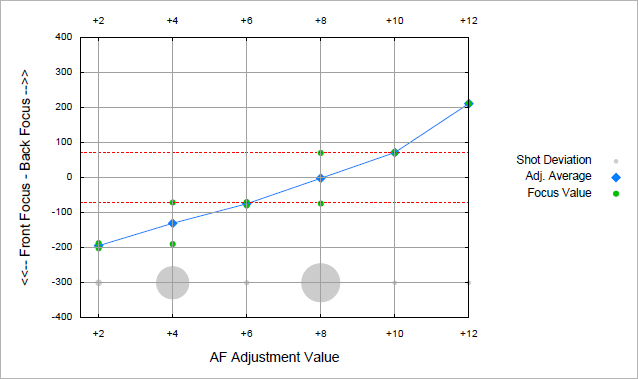
Again it looks like a setting of +8 is best, but just to double check, below is the result of a set of images with 6 shots at +7, 6 shots at +8 and 6 shots at +9
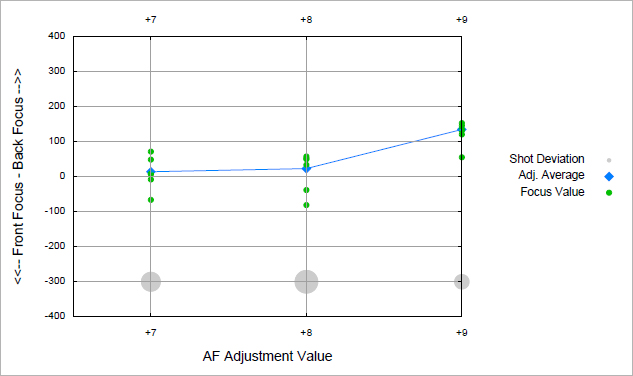
As expected there is some shot to shot variation in focus at each setting. This is normal and expected. Looks like +7 and +8 are pretty much the same so I left focus microadjustment at +8.
How much difference does this make to image sharpness? To test that I took shots with no focus microadjustment and shots with a +8 settings and here are the results of that test (100% crops from EOS 6D image, EF65/1.8 @ f1.8):
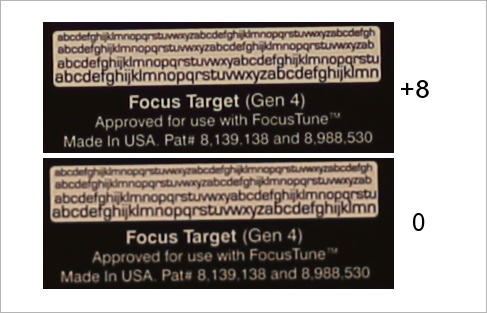
The shot at +8 is clearly a little sharper, so the system works. +8 isn't a big offset and in practice, with 3-D subjects, it might be hard to see much difference in day to day shooting, but there's no denying that sharpness is indeed higher with a +8 focus microadjustment setting.
Sharpest Aperture
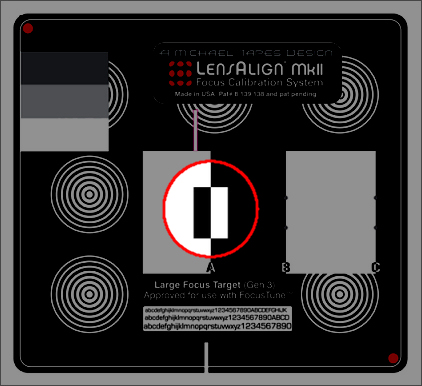
While determination of front/back focus is done using the slanted scale, sharpness is measured using the focusing target. More specifically it's likely that the black/white vertical edge which should be centered in the frame when testing most lenses (shown circled in red in the image above) is the primary feature used to measure sharpness (though other areas may also be used). Sharpness measurement is usually done by measuring a black/white edge profile's steepness, which can then be converted fairly easily into a measure of MTF. Additional edges (marked B and C) may be used when the system for special applications, such as looking at macro or other lenses working at higher magnification than the standard recommendation of 1:25.
Once you have a system which focuses accurately, you can use FocusTune to see which lens aperture is sharpest. You simply take a series of shots of the LensAlign target at deferent apertures and FocusTune will create a plot of sharpness against aperture such as the one below for my Canon EF 50/1.8 lens.
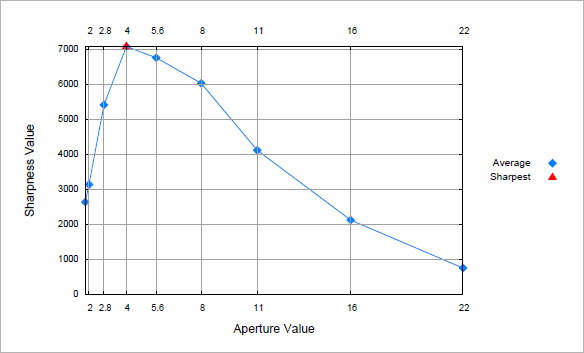
It's clear here that f4 is the sharpest aperture and that's pretty much what I would have expected. Most (but not all)lenses are at their sharpest when stopped down a couple of stops from wide open. The sharpness scale is uncalibrated so all this tells you is the sharpest aperture, not how sharp it is. You can't compare lenses.
For this particular lens I also analyzed a second set images using other software and an additional target attached to the LensAlign target so I could get some actual resolution numbers estimates. These are shown in the image below.
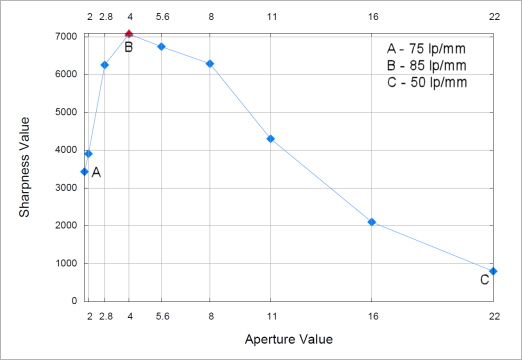
It's clear that the FocusTune scale numbers aren't directly proportional to resolution ("0" isn't "0" resolution). However,the system of LensAlign and FocusTune does what it set out to do in this case, indicate the sharpest aperture of the lens in question. For this lens it looks like the best (or at least the sharpest) results should be obtained with apertures between f2.8 and f8, and that stopping down to apertures of f16 or f22 (as you might be inclined to do for maximum depth of field) will, as expected, result in diffraction softening of the image.
I would note that the LensAlign target could be used to generate actual resolution (or MTF) measurements. The digital image of the black/white vertical edge can be used to generate an edge step function (ESF), which can, via differentiation, in turn be used to generate a line spread function (LSF). The fourier transform of the LSF leads to the modulation transfer function (MTF) of the lens, which is a measure of sharpness (and resolution). See http://www.bobatkins.com/photography/technical/mtf/mtf1.html and the following pages for a more detailed explanation of MTF. A slanted edge gives a little more accuracy, but a vertical edge can be used.
FocusTune also incorporates a useful utility that allows you to rename your files with shooting information included in the same. So, for example you can rename IMG_1234 to IMG_1234_p00_Can-70D_Canon EF 50mm f1.8_f018.JPG, indicating the shot was taken with a focus microadjustment setting of 0 (p00), and EOS 70D and an EF 80/1.8 @ f1.8. The renaming utility picks the shooting information directly from the EXIF data included with the image.
A final note I'd add is that with some cameras and some lenses the exact position of best focus may depend on the nature of the illumination being used. If you calibrate your camera/lens system indoors using a Fluorescent or LED based light source, you may not get exactly the same value for focus microadjustment that you would if you were setting the system up outdoors in sunlight or indoors using Tungsten light. While the difference may be small, with a fast lens you do not have much DOF and small differences in focus can have a significant affect on sharpness. If you are critically concerned about sharpness you might want to calibrate using the same light as you will use in practice, or even get focus microadjustment values under various types of lighting and later enter the value which corresponds to the light being used. When shooting at smaller apertures (say smaller than f2.8) this effect is unlikely to be of concern to most photographers, but you should be aware of the possibility of illumination dependent focus shifts and check for them if you are concerned. For more on this, see Effect of the Light Source on Focus Accuracy
Conclusions
The LensAlign system is well designed and does what it claims to do. It enables the user to tune focus microadjustment for best results and find the sharpest aperture of a lens quickly and easily, especially when the FocusTune software is used. The system is built in the USA and support from the manufacturer seems excellent, so if you run into any problems or need some technical information, someone will be there to help you out. If you are serious about wanting to optimize your lenses (within the limits of focus microadjustment's ability to do so), I'd certainly recommend getting the FocusTune software along with the LensAlign hardware.
There's some validity to the argument that the hardware is a bit expensive for what you get, if you look at it as an assembly of flat plastic parts. However you're paying for the design, development and support - plus small scale USA manufacturing and printing of the scales and targets - more than raw materials cost. Is the system (hardware and software) worth $125? Well, that depends on how concerned you are about focus accuracy and image sharpness. If you've spent thousands of dollars on the best camera(s) and a number of high quality lenses you can afford and you are critical about the sharpest possible images, then it seems like a relatively small extra investment to get the best out of your system using a system that makes that process relatively easy. If you're a casual shooter with one camera, a few lenses and no money, then you can optimize focus based on a "trial and error" basis, shooting real world images at various focus microadjustment settings and looking at the images to try to see which one is sharpest, but it's going to take longer and it's probably not going to be as accurate - though it may be "good enough".
One criticism I have is that I found the documentation a scattered and somewhat disorganized, but it's there if you look hard enough for it and don't give up in frustration! Well organized (and searchable) documentation would certainly make the system much easier to use and understand. The videos are good, but there's no way to search them for the item of information you are looking for and no easy way to tell which of the videos it's in. Also, some of the illustration on the website are of earlier target versions with different patters to the current version and this may cause some confusion for new users.
How much does it cost and where can I buy it?
The focusing target system "LensAlign" (i.e. the hardware) will cost you around $85. The complete system, which includes the "LensAlign" hardware and the "FocusTune" software will cost you around $125. The software is $55 if bought separately, but unless you already have the LensAlign system the software will be of limited use since it's designed to work with the geometry and graphics of the LensAlign.
You can find these items for sale from a number of vendors. Make sure that what you are buying is the current, latest version. Some vendors might be selling older models. You should be sure of the latest version if you buy directly from the manufacturer (michaeltapesdesign.com).
