Scooter Hydraulic Brake Fluid Flush and Bleeding the Brakes
This spring I pulled my 150cc scooter out of its winter storage and checked it over prior to its annual inspection. All seemed fine except the rear brake lever had more travel than usual. In fact I could pull it all the way back until it was almost touching the handlebar grip. On most scooters - which have a bable operated reaar drum brake) this might mean a small tweak of the rear drum brake cable adjustment screw, but my scooter has hydraulic disk brakes front and rear. Hydraulic disk brakes are self adjusting - there is no screw to turn to adjust brake lever travel, so this was a bit unusual.
First thing to look at was the brake fluid reservoir for the rear brake. This is usually located right at the brake lever for both front and rear brakes on most scooters, which in turn means it's hidden underneath the plastic body panel which surrounds the dashboard. Every scooter is different, but if you remove all the screws you can see, the plastic covers should pull off revealing the brake levers, brake fluid reservoirs and miscellaneous electric wired, headlight connections etc.
Brake fluid reservoirs are usually easy to spot. They almost always have some sort of label on them, or a cover with instructions as to what type of fluid should be used. A typical reservoirs is shown below. Most systems will specify DOT3 or DOT4 fluid. DOT stands for Department of Transportation and both type3 and type4 brake fluids are polyethylene glycol based. DOT4 has slightly better specifications and has pretty much replaced DOT3. If you don't know if you have DOT3 or DOT4 in your system, they can be mixed, so just add DOT4 and you should be fine. Note however that DOT5 is silicone based and should not be mixed with DOT3, DOT4 or DOT5.1 fluids. Adding to the confusion is DOT5.1 which is glycol based and can be mixed with DOT3 and DOT4. Remember that DOT5 is the odd one out. Brake fluid can be quite nasty stuff. Glycol based DOT3, 4 and 5.1 can dissolve car/bike/scooter paint and is something you really don't want to get on your hands and you especially don't want to get in your eye. Take precautions like wearing rubber gloves and eye protection.

A typical brake fluid reservoir such as the one shown above has a cover held on my two screws. Use the correct sized phillips screwdriver to loosen the screws and remove the cover. If the screws are tight and you don't use the right size screwdriver you can strip the heads of the screws. On an old motorcycle I restored, the screws were so sight that I had to drill the heads off them to get the cover off! Under the cover will likely be one or two plastic/rubber gaskets which need to be removed before you can see the level of brake fluid.
When I looked into the reservoir for the rear brake, it was just about empty, which probably explainted why I was getting so much brake lever travel. I suspect some air had been sucked into the system. The reservoir also contained what looked like coffee grounds, but which was probably corrosion products (I said brake fluid was nasty stuff), so instead of just filling up the reservoir with more brake fluid I decided to clean out the reservoir and replace all the fluid in the system. Brake fluid absorbs water from the air which can reduce it's performance and add to corrosion and it's not a bad idea to replace it every few years anyway, even if it looks OK to the eye. In this case the remaining fluid looked like coffee (with grounds) rather than clear, so it was certainly time to change it.
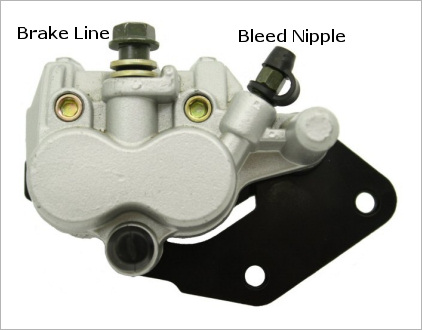
Flushing out the system is pretty easy and takes only a few minutes. On the brake caliper there is a "bleed nipple" as shown in the illustration below:

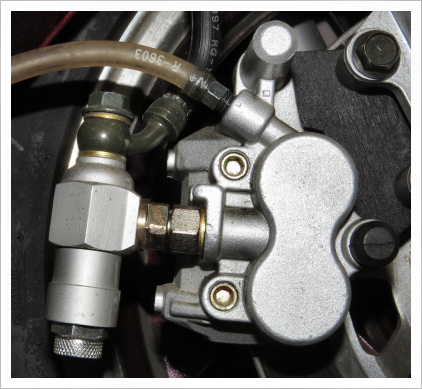
When this screw is opened it allows brake fluid to pass through the system. When it's closed (as it is normally) brake fluid is trapped in the system and pushes the brake pads onto the brake rotors to slow you down. To flush the system you remove the cap from the bleed nipple and attach a short length of plastic or rubber tube (clear transparent tubing is best)as shown below. The open end of this tube should be placed in a small glass jar. After filling the reservoir with clean new brake fluid you SLOWLY (very slowly) apply the brake. If you squeeze it too fast, brake fluid will squirt up out of the reservoir. Then you open the bleed nipple and brake fluid will flow out and down the tube and the brake lever will move all the way back until it hits the hand grip. At this point close the bleed nipple and slowly release the brake lever. Now do it again. Squeeze the brake lever, open the bleed screw to allow fluid to flow into the tube, close the bleed screw and release the brake lever. Each time you do this the level in the reservoir will drip slightly, so keep an eye on it and top it up if necessary. Keep doing this until the fluid coming out of the bleed nipple looks clear (probably this means you'll have to refill the reservoir a couple of times).

That's pretty much it. At this point the brake lever should feel firm and only move back and inch or two to fully apply the brakes. Fill the brake fluid reservoir, but leave a gap for the sealing gaskets (usually that means the fluid should be about 1/4" from the top of the reservoir). Replace the gaskets and cover. The system will be full of clean brake fluid and you should be fine for the next few years.
"Bleeding" brakes is a very similar process, though for a different reason. If air gets into the brake line, the brake lever become "soft" or "spongy" and the brakes don't work very well. To remove the air from the brake line you perform the same actions as a brake fluid flush, but often the air will be displaced before all the fluid in the system is replaced. It doesn't hurt to replace the fluid at the same time, especially since the capacity of scooter brakes is so small.
There are other systems used to flush the brake system involving the use of a vacuum to pull fluid though the system. They work just fine and can be useful for higher volume systems with longer brake lines such as those found on cars and trucks. For scooters and motorcycles where brake lines are usually short and brake fluid volume is small, the simpler manual method describes here is typically all that's needed.