

Lensbaby Composer and Lensbaby Optics Kit
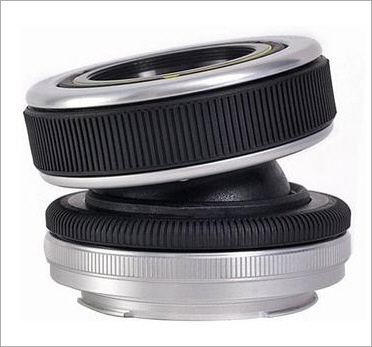 Lensbaby Composer |
For those not familiar with Lensbabies, they are a series of lens holders and optics designed for special effects. By using simple, uncorrected lenses (and pinholes) the images they create are deliberately soft and can be used to mimic the effects of "plastic cameras" like the Diana and the Holga, while still retaining all the control that an SLR or DSLR provides. All the Lensbabies provide for some sort of lens tilt, and some can even be shifted slightly.
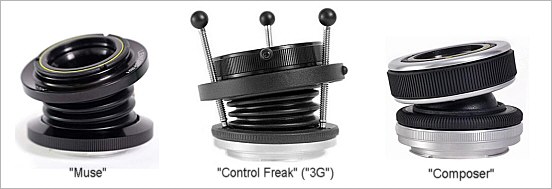
Evolution of the lensbaby!
The original Lensbaby was just a corrugated plastic tube connecting a camera body mount on one end a mechanism to hold a simple lens on the other. Currently Lensbaby calls this model "The Muse". The lens was simply moved around with the fingers to give the desired effect and focused by squeezing the tube. The advantage of the "Muse" is a relatively low cost. Next in the line was the Lensbaby 3G, which will be updated to the "Control Freak" early next year. An ungainly looking gadget, but it allows precise control and locking of lens position via 3 threaded rods and may be the best choice for precise control of effects in macro type work where there is no time constraint on setup. The latest model which I'll discuss further here is the "Composer". This model has a "ball and socket" type construction enabling the lens to be quickly and easily tilted in any direction. It has a focusing ring just like a normal camera lens, so operation is fast and it's well suited for portrait and scenic work.
There are Lensbaby versions for Canon EF (EOS), Nikon F, Sony Alpha A / Minolta Maxxum, Pentax K / Samsung GX and Olympus E1 / Panasonic Lumix DMC. Automatic light metering is possible by shooting in aperture priority mode for almost all digital and film SLR camera bodies except certain Nikon bodies including the D40, D50, D60, D70, D70S, D80, D90, D100, N50, N65, N70, N75, N80, Kodak 14N and ProN, & Fuji S1, S2, and S3.
One thing to realize up front is that these aren't tilt and/or shift lenses in the normal sense, even though they may be capable of being tilted and shifted. The tilts and shifts here are designed to produce special effects of blurring and/or vignetting, not to provide optical corrections. The tilt function is designed to move the "sweet spot" (sharper area) of the image around in the frame, not specifically to tilt the plane of focus. Actually the optics described here don't really have a plane of focus since they are not designed to be flat field lenses. They have a curved focal surface, which in part accounts for the blurring of the image away from the center of the field.
Lensbaby Optics Kit
There are a variety of optical elements which can be fitted into the Lensbaby housing as shown below. Lensbaby call the lens housings "Lenses" and the optical elements "Optics"

Lensbaby Optics
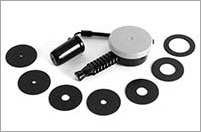 The optics are color coded. The multi-coated two element glass optic is supplied with each Lensbaby as standard (yellow), Also available are an uncoated single glass element lens (orange), an uncoated single plastic element lens (blue) and a combination pinhole/zone-plate lens (pink). In each case the aperture is set by inserting a magnetic disk with a hole in it into the optics housing using the tool provided. Disks are provided for f2, f2.8, f4, f5.6, f8, f11, f16, and f22. All the optics have a focal length of approximately 50mm. The pinhole is f177 and the Zone Plate is f19. Both have an effective focal length (distance from the film/sensor plane) of around 50mm. The pinhole/zone-plate optics assembly contains both a pinhole and zone plate on a sliding carrier. To switch between then you simply slide the "optics" carrier to one side or the other.
The multi-coated dual glass optics give the "best" image, i.e. highest contrast and sharpest in the center. The single glass element shows more softness and distortion and adds some color finging, and the plastic lens takes those abberations even further. The pinhole creates a uniformly soft image, while the zone-plate gives a soft, diffuse, "dream like" effect with halos around bright or high contrast features. +4 and +10 diopter screw in closeup lenses are also available for macro work and allow focus from 2" to 14". They are probably best used with the standard two element optical assembly (yellow). Wideangle and telephoto adapters are available. The standard wideangle is 0.6x (30mm), the Super wide angle is 0.42x (21mm) and the telephoto is 1.6x (80mm). Recently fisheye and soft focus optics have been added to the lineup.
The optics each come with a hard plastic storage case and a small microfiber lenscloth.
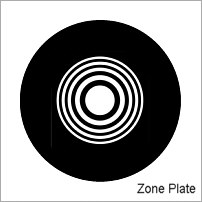 The pinhole "lens" is, well, a pinhole (well, a pinhole sized clear region on an otherwise opaque glass background) The focal length of a pinhole "lens" is just the distance from the pinhole to the film/sensor. Though it's just an empty aperture there is an optimal diameter for a pinhole which depends on how far from the film/sensor it is placed. For 50mm it's in the region of 0.3mm which means an f-stop in the region of f170. The zone plate is a optical component which focuses via diffraction rather than refraction and it consists of a set of concentric rings and spaces etched on glass as shown on the left. The effect is something like a pinhole (soft) but has a different character. Zone plates can also be faster than pinholes which means shorter exposures can be used. The Lensbaby zone plate is approximately f19, which makes it about 3 stop faster than the pinhole.
The Composer
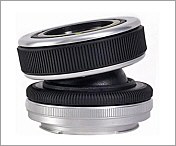 The composer is certainly easier to use then the earlier models. The ball action is smooth and the amount of friction can be adjusted via a knurled ring next to the lens mount. The Composer focuses via a ring at the front and while the focus action isn't damped, is certainly more accurate and faster than the "Muse" squeeze system. The slowest part of the operation is probably selecting and changing the iris. It's not difficult but you need to extract the old iris using the magnetic tool provided, select the new iris and use the tool again to set it into the lens. It's not bad if you know what aperture you want, but if you want to try the effects of, say, f2, f8 and f16 on a shot it does take time to switch the iris plates. One advantage of the plate system rather than an adjustable iris is that the apertures are perfectly round rather than shaped like a pentagon (for a 5 blade iris system). This means that out of focus highlights will also be round rather than pentagonal and may tend to make the out of focus areas look a little smoother. You can also buy special effect iris shapes (star and heart) or blank iris disks in which you can cut your own apertures.
Since the Composer has no electrical contacts, the camera doesn't know which lens is mounted (and obviously can't adjust the aperture!). However auto-exposure operation is available on most cameras if the camera body is set to aperture priority (Av) mode (the exceptions, mostly Nikon, are listed above). The camera will then select the appropriate shutter speed, or at least close to it. You might have to use a little exposure compensation for the image you like best (or shoot in RAW mode and post process in DPP for Canon users).
Lensbaby Image Examples
I make no claims at all be be a good "Lensbaby Photographer" but at least these images may give you some idea of the effects that the various lens options can produce.
(1) Pinhole and Zone Plate Optics (pink)
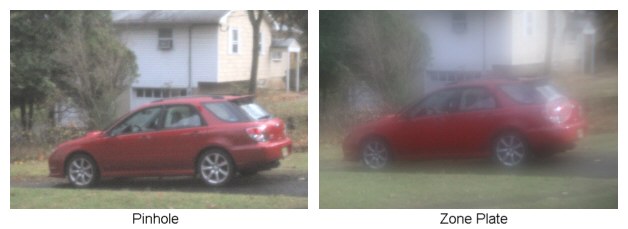
On the left is a pinhole image. It shows uniform blur. On the right is the zone plate image. It's a little sharper, but the main characteristic is the "glow". Tilting the lens has little effect on pinhole and zone plate images. The images below are 100% crops. Image noise is due to the fact that they were shot at ISO 6400 (EOS 7D) in order to get reasonable shutter speeds. The pinhole exposure was 1/15s, the zone plate exposure was 1/160s (about 3 stops faster than the pinhole).
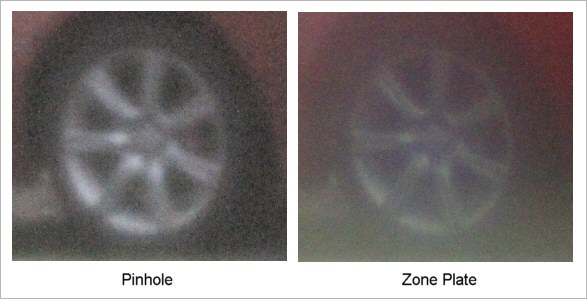
You can see the zone-plate has higher resolution, but lower contrast and more "glow" (flare).
(2) Dual Element Multicoated Optics (orange)
These are the optics which are supplied as standard with the various Lensbaby models (including the Composer).
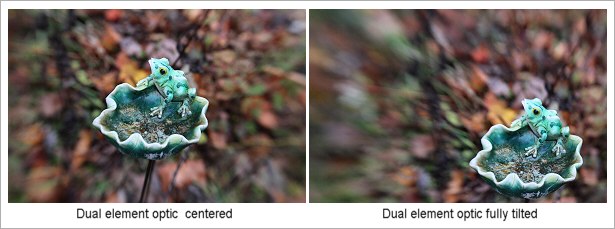
The images above show the results of using the dual element optic with the f4 aperture on an EOS 7D crop sensor camera. On the left the Composer was centered, while on the right it was fully tilted towards the lower right. This moves the "sweet spot" (sharp) area of the image down to the lower right of the frame. The similar images below were shot using a full frame EOS 5D.
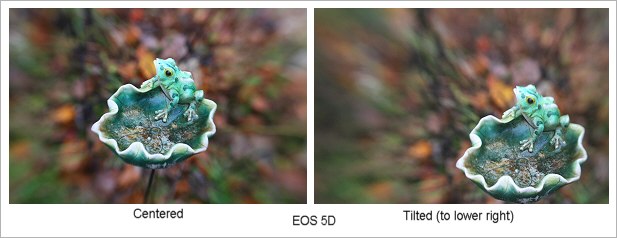
As you can see the effect is similar, with a little more background blur. The optics do have full frame coverage.
Smaller apertures will give lower levels of blur, larger apertures will give more blur and reduce the size of the "sweet spot" somewhat. Note that for these shots I had to adjust exposure compensation to give the exposure I wanted, especially when the lens was tilted. The best procedure is probably to use manual exposure and check each image on the LCD (assuming you are shooting digital). I found that I needed to dial in a little negative exposure compensation in auto modes, especially when the lens was tilted.
Single Element Glass Optic (yellow)and Single Element Plastic Optic (blue)
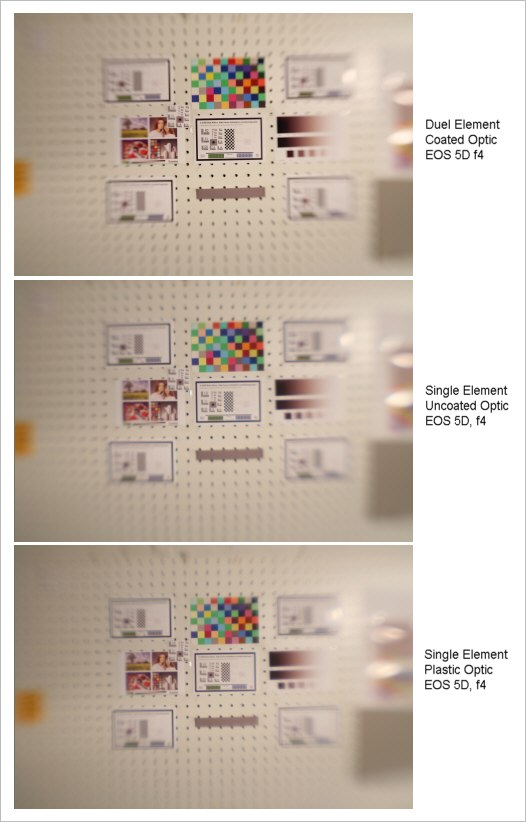
The tilt behavior of these lenses is similar to that of the two element glass optic but the overall image is softer and shows more color fringing (chromatic aberration). A comparison of images shot with these lenses is shown below. All three images were shot at f4 on an EOS 5D and are 100% crops. Remember that a 100% crop represents part of a really big image, on most monitor probably something like 24" x 36". You wouldn't normally print Lensbaby images that big! So, looking right in the center of the frame:
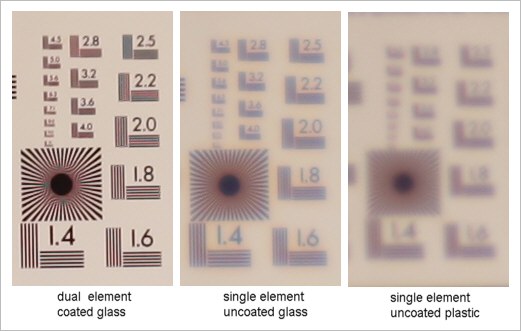
On the left is the result of the dual element multicoated glass optic. The center of the image is pretty good. Contrast is high and sharpness is high. In the center is the result of the uncoated single element glass optic. Contrast is much lower and sharpness has dropped. Technically this is likely the result of the inevitable spherical aberration that a single element lens produces. Lastly, on the right is the result from the uncoated plastic optic. Sharpness has dropped even more. Remember these are all shot at f4. At f2 the effects would be more pronounced while at f16 the contrast and sharpness of the single element optics images would increase (an set of example images shot from f2 to f22 can be found in my earlier review of the Lensbaby 3G) Below are the full frame images from which the 100% center crops were taken:
Finally here are a few shorts taken with the composer using the +4 closeup lens on both the dual element multicoated optic and the plastic uncoated optic. These are uncropped full frame shots taken with an EOS 5D.
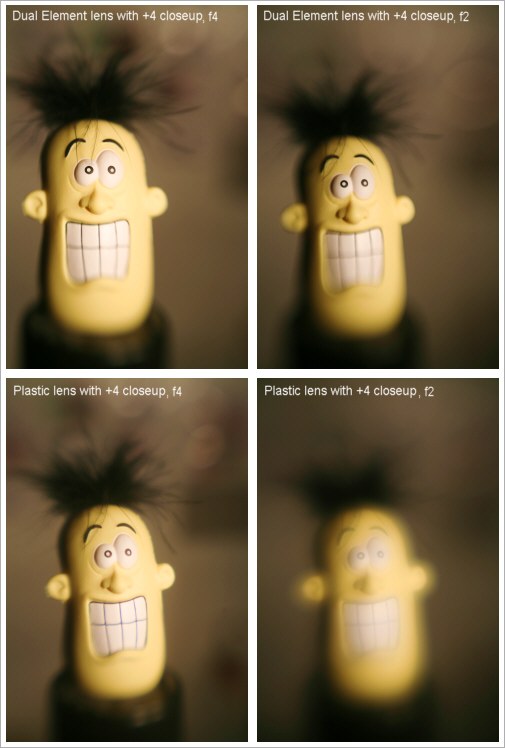
You can see how stopping down just two stops sharpens the image, especially in the case of the plastic lens which starts out with a lot of (deliberate) spherical aberration.
If you found this article interesting, please tell others about it...
Conclusion
The Lensbaby composer is certainly unlike any other lens. If you're tired of the never ending quest for sharper and sharper images, then it may come as a refreshing change. However it's worth remembering that just because an image is blurred and distorted doesn't make it good. It's probably more difficult to use a Lensbaby creatively and produce interesting images than it is to produce interesting images with a "normal" lens. The Lensbaby is an easy lens to use, but that doesn't mean it's an easy lens to use effectively. Some people will "get it" and some won't. If you're one of the ones who do, then a Lensbaby can be a lot of fun!
A Lensbaby might be an interesting holiday gift for the photographer who otherwise has everything.
For examples of images by a photographer who "gets it", take a look at at Sam Grey's Lensbaby image gallery
Related Articles
- Lensbaby Fisheye Optics
- Lensbaby Soft Focus Optics
- Lensbaby 3G
- Original Lensbaby (now replaced by the similar "Muse" which has switchable optics)
Where to Buy
The Lensbaby line is carried by a number of photography retailers including
