

Background Blur and Bokeh - a multifunction optical blur calculator
This is a small Windows program written in Visual Basic which performs an number of functions related to calculating the degree of image blur you can expect for various amounts of defocusing. Basically you can calculate the sharpness of the image outside the traditional "depth of field" limits. This is useful if you want to compare various lenses and formats to see what the effects are on the background (or foreground) blur in an image. It's part of what constitutes "Bokeh" (a Japanese term meaning something like "fuzzy", but not necessarily in a photographic context!). While "Bokeh" is a measure of both the quantity and the nature or quality of background blur, this program only calculates the quantity. You can't calculate the nature by any simple method even if you know the optical construction of the lens. The program also calculates the traditional depth of field and hyperfocal distance, but it goes quite a bit further than most DOF and HFD calculators do.
One thing that this calculator demonstrates, and it's a point that people often fail to realize, is that depth of field and background blur are not the same thing and indeed may not even be closely related. People think that a lens setting with a small depth of field will blur the background more, but that isn't necessarily true. The math is quite different in the two cases. Depth of field will give you an estimate of local blurring about a subject in focus, i.e. how blurred the image will be just outside the traditional "depth of field" limits. However that doesn't correlate with how blurred the image will be of objects at a significant distance behind the subject in focus.
This is demonstrated in the images below. They are taken so that the subject (the 3 film boxes at different distances from the camera) are inside the depth of field and they are taken so that the subject is magnified the same amount (i.e. is the same size) in each image. In both cases the depth of field is the same, but I think it's obvious that the degree of background blurring is quite different. In this case the background was maybe 100m behind the subject, which counts as "a significant distance"!
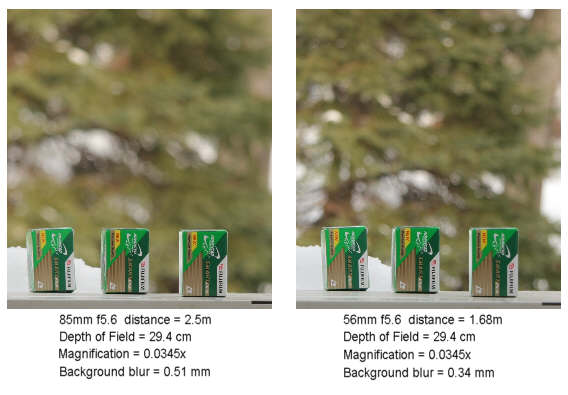
If the background is far enough away (well outside the depth of field) and the subject if fairly close (well inside the hyperfocal distance) the degree of blurring is related to the absolute physical size of the lens aperture. For a 56mm f5.6 lens that would be 10mm and for an 85mm f5.6 lens it would be 85/5.6 = 15mm. So you'd expect the far distant background blur of the 85/5.6 to be about 50% more than that of the 56/5.6, and, in fact, it is!
Based on this you can see why a 600/4 lens wide open (physical aperture = 150mm) will blur the far distant background far more than a wide open 50/1.4 lens (physical aperture = 35.7mm). In fact it will blur it 4.2x more. However if shooting the same subject at the same magnification (let's say 0.01x, which would by typical for a full body shot of a person), the depth of field of the 50/1.4 will be about 1/3 of that of the 600/4 and so will blur close in objects more.
There's no really simple "rule of thumb" that will tell you whether relative aperture (f-stop) or absolute aperture (size of the aperture in mm) will be most important in determining the degree of blurring at a given distance behind (or in front of) a particular focus point. Hence the need for this calculator!
Incidentally, here's an example of "Bokeh", something which this calculator doesn't calculate:
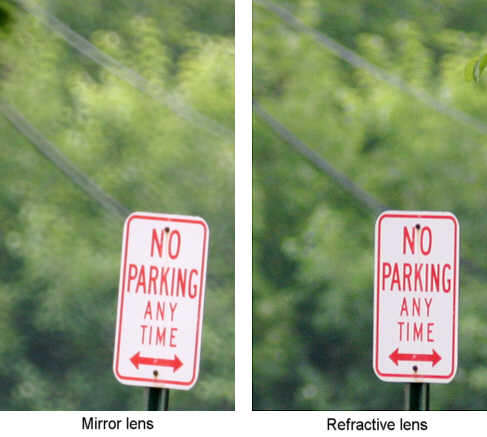
On the left is a shot taken with a 500mm mirror lens which has a central obstruction (the secondary mirror). On the right is the same shot but taken with a normal refractive lens which has an unobstructed aperture. Though the actual degree of blurring is about the same, most people would agree that the smoother "Bokeh" of the background images by the refractive lens is more pleasing and less distracting than that imaged by the mirror lens.
This program uses the usual geometric optics model as the basis for calculation, but it does partly take into account the wave nature of light and diffraction limitations. The geometric optics model assumes light can be focused to in infinitely small point, which of course is not true. The smallest spot to which light can be focused is called the diffraction limited spot size, and it depends only on the relative aperture (f-stop) at which the lens is being used (for a perfect lens). The program takes this into account by not allowing any calculated value for image blur to be smaller than the diffraction limited spot size. If the result of a geometric optics calculation predicts a blur circle diameter smaller than the diffraction limited spot size, the value of the diffraction limited spot size is substituted.
Probably the best way to explain what it does if to go through the controls one by one. Below is a screen shot of a typical screen.
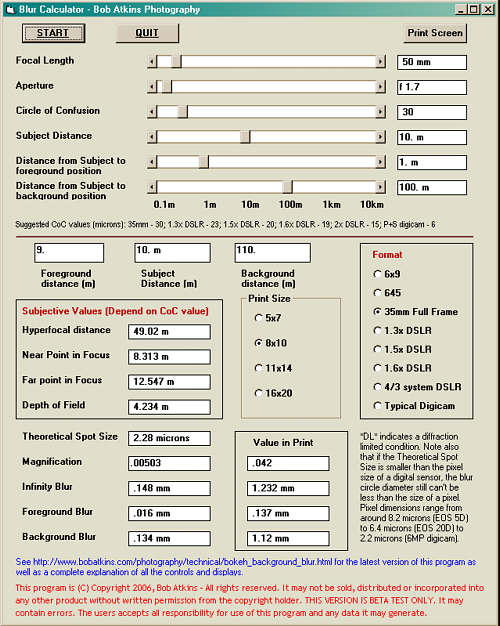
There's a "START" button to start the program, an "EXIT" button to end the program and a "PRINT" button which sends a graphic image of the screen to a printer.
The inputs are mostly controlled by sliders. The first one sets the focal length in 1mm increments from 10mm to 600mm. The second slider sets the aperture in steps of 0.1 stops from f1.0 to f32. The third slider sets the value you want to use for the circle of confusion value which is used in hyperfocal distance and depth of field calculations. Some suggested values are given on the screen. The fourth slider sets the distance of the main subject in your image, i.e. the distance at which the lens is focused. This goes from 10cm to 10km.
The last two slides set two points, one in font of the main subject and one behind the main subject. Slider #5 sets the distance between the subject and the closer point at which you want to calculate image blur and slider #6 sets the distance between the subject and the further point at which you want to calculate blur.
The screen shot above shows a 50mm lens at f1.7 focused at a distance of 10m. The near focus point is set 1m in front of the focus point and the far focus point is set 100m behind the focus point. These values are reflected in the three readout windows below the sliders. The leftmost window shows the distance from the lens to the closer point (10m - 1m =9m), the center window shows focus distance again and the rightmost window shows the distance from the camera to the farther point (10m + 100m = 110m).
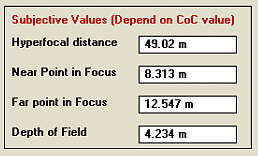
Below these values is a box on the left which groups together Hyperfocal distance (HFD), Depth of Field (DOF), the Near Point in Focus and the Far Point in Focus. These values are grouped together because they are subjective quantities, i.e. they depend on what YOU think is sharp and what number YOU chose for the value for the circle of confusion. For 35mm work the usual CoC value is 30 microns and it's based on what would look sharp to most people when viewing and 8x10 print from a viewing distance of about 18". However CoC is something YOU pick, not an optical property of a lens. Picking a different value doesn't change the image in any way! You'll see this if you move the CoC slider. The 4 values in this box will change, but none of the other values will.
Next the theoretical minimum diffraction limited spot size is shown. The is the minimum diameter of the circle into which light can be focused by a perfect lens. Below that is the magnification, which is the ratio of the size of the image to the size of the subject.
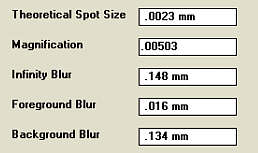
The next display shows what the size of an image of a point at infinity will be. This is directly related to the amount of distant background blur in an image. The final two displays show the size of the image of a point at the chosen foreground position (in this case at 9m from the camera and 1m in front of the focus point) and at the chosen background position (in this case 110m from the camera and 10m behind the focus point). Note that although the program allows this point size to be smaller than an individual pixel in a digital sensor array, in that case the number isn't meaningful as a point as recorded by a digital sensor cannot be smaller than the pixel size.
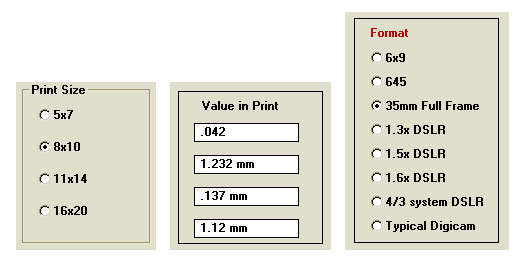
To the right of these displays are a second set of displays which show the corresponding sizes in a print. Since the original image has to be enlarged to make the print, these values are correspondingly larger. The enlargement factor is determined by the size of the print and the film or sensor format and is selected via the "radio buttons" for various print and sensor sizes
This program can be used in a number of ways. for example you can compare the foreground and background blur that you'd get using the same lens on a full frame and 1.6x DSLR by first setting the sliders for the full frame condition and with the "full frame" radio button selected. Note the "magnification" in the 8x10 print. Then select the 1.6x button and adjust the "Subject distance" slider until you get the same print magnification factor that you had before. This gives you the same field of view. Now compare the blur values with those you had in the full frame case.
The key to comparing the results of various formats is to keep the magnification in the print constant.
You can download the program HERE
In order to run, the program requires the Vbrun300.dll file be in your system folder. This may already be the case since all programs written in Visual Basic 3.0 require it and some autoinstall it. If the program doesn't run, you can download a vbrun300.dll installer directly from the Microsoft website
The program is free for non-commercial use but it is NOT public domain, meaning that you can't sell it, incorporate it into any other product, distribute it or modify it in any way or use it to make money for yourself without first obtaining a written license from the copyright and intellectual property owner, i.e. me!
Note that the decision to download this software and to run it on your system is up to you to make. I take and accept no responsibility for any problems which may occur as a result of downloading, installing or using this software. I don't except you will have any problems and I don't have any problems running it, but you can never say never when it comes to software.
The program is self contained and makes no changes to your system, the registry, nor does it create any new files. To remove it just delete the file.
If you found this article interesting, please share it with others:
