

White Balance and Color Temperature made simple
White balance is simply a "digital filter" which corrects an image for the color of the light source in order to record and display an image with the correct colors. That's the simple explanation, but there's a lot of digital technology and physics behind it. I'll get to the full explanation later in this article, but I'll start out with basic, practical information.
Most digital cameras, from high end DSLRs to simple P&S digicams, have a number of white balance settings such as Auto, Sunny, Cloudy, Shade, Flash, Fluorescent, Custom and Kelvin. When you're rapidly moving from indoors to outdoors and from sun to shade and you want the camera to try to do most of the work for you, choosing Auto white balance is a good idea. While not perfect, the camera will analyze the image and use built in algorithms to make a best-guess at what digital filter will give the most accurate colors. The filter setting it selects may be slightly different on every shot, even shots taken under the same lighting, but generally it gives pretty good results.
If you know what your lighting is, e.g. full sun, cloudy sky, deep shade etc., you can set white balance to one of those values. In this case the digital filter the camera uses to obtain the colors will be exactly the same from shot to shot. As long as your lighting doesn't change the images should be consistent in color.

You can also choose one of the preset options if you don't want "correct" colors. For example if you want the image to look "warmer" and you are shooting in sunlight, you could select the "cloudy" white balance. If you want it to look warmer still you could select the "shade" white balance. On the other hand if you were shooting in sunlight but wanted the image to look cooler, you could select the "fluorescent" color balance. A higher K value makes images look warmer, a lower K value makes images look cooler.
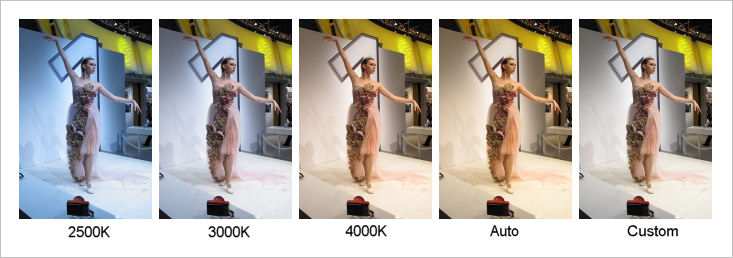
Examples of various different white balance settings applied to the same image
The K or Kelvin setting allows finer control. For example, as shown in the table above for the Canon EOS 7D, the "sunny" WB setting corresponds to 5200K (don't worry what "K" is for now, I'll deal with that later), the "cloudy" WB setting corresponds to 6000K and the "shade" WB setting corresponds to 7000K. By choosing the Kelvin white balance option you can choose something between "Sunny" (5200K) and "Cloudy" (6000K), for example 5682K. Why would you do this? Well both the "sunny" and "cloudy" settings are just general guesses. They may depend on time of day, how thick the clouds are etc. You might get a color balance that looks better to you at something other then the preset options. You can also tune the colors if you you want a warmer or cooler look. Higher Kelvin settings then the "correct" setting makes the image look warmer (more red), lower Kelvin setting than "correct" make the image look cooler (more blue)
Finally there's a "Custom" white balance setting on many cameras (and on all DSLRs and more advanced digicams). This is the most powerful option and allows you to make color corrections that can't be made using any of the preset option, the auto option of the Kelvin option. Different cameras may have different methods of setting the custom white balance, but in essence they all work by you first taking a picture of a neutral colored target (white or grey) and then the camera using that to calculate the right white balance setting. A neutral target is either a white card or a grey card, something with no color tint. Typically you place the neutral target in the same lighting that you will be shooting in, fill the frame with it, take a shot and instruct the camera to use that shot to make its white balance calculation.
Why you don't need to bother about white balance if...
...your camera has the option of saving RAW files and you choose that option. All of the above discussion of white balance setting affects JPEG images produced by your camera. The white balance setting affects how the camera processes the raw data coming from the sensor into the final JPEG image. However when you save your images as RAW file, you are saving the raw data. In the RAW converter (e.g. Canon's DPP), you can apply any white balance you want. You don't have to pick it at the time of shooting as you do when shooting JPEGs. This gives you a lot more control. However if you want to use the custom white balance option you have to either take a RAW shot of a neutral target and save it, or include a neutral target somewhere in your shot that you can then use to create a custom WB setting.
Is there any advantage in picking the "right" color balance when shooting RAW? Well, it will give you the "correct" colors in your review and playback images. However it won't affect the RAW file in any way. All it does is chose the default white balance which is applied when you convert from RAW to JPEG, but you can easily change the default to another setting.
And now the technical explanations
Everyone is probably familiar with the fact that as you heat up an object (e.g. a metal bar in a furnace) it first starts to glow dull red, then as the temperature increases it glows bright red/yellow and if you get it hot enough without melting it it can become "white hot". The color of the light can be described as having a "color temperature". The red light from the cooler bar has a lower color temperature than the white light from the hotter bar.
At lower temperatures the light from the bar is "warm", i.e. it contains much more red light than blue light. As the temperature increases the light becomes "whiter", i.e. it contains relatively more blue light. You can assign a temperature to the quality of the light and this temperature is expressed in degrees Kelvin. While you may normally measure temperature in degree Centigrade of degrees Fahrenheit, scientists often measure temperature in degrees Kelvin. Kelvin uses absolute zero (-273°C) as its starting point so you can just add 273 to any Centigrade temperature to get the Kelvin temperature. For example light from a typical 60W tungsten filament bulb is generated by the hot filament which is at around 2527 degrees Centigrade or 2800 degrees Kelvin. That means it can be said to have a color temperature of 2800K. Similarly the light from the sun (the surface of which is at around 5800 degrees Kelvin) is said to have a color temperature of 5800K.
Technically speaking the color temperature of a light source is referenced to a black body at that temperature. A black body is something that absorbs all incident electromagnetic radiation, regardless of frequency or angle of incidence. It also radiates the maximum theoretically possible amount of radiation at all frequencies (wavelengths) when heated.
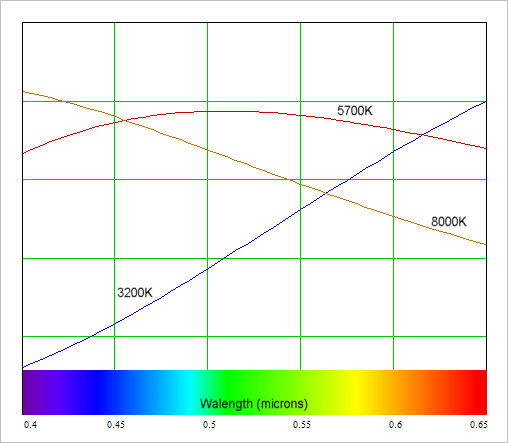
The above figure shows the relative amount of visible light given off by a black body at temperatures of 3200K, 5700K and 8000K. As you can see, at 3200K there's a strong bias towards the red end of the spectrum. At 5700K the light is pretty uniformly distributed across the spectrum and at 8000K there's a strong bias towards the blue end of the spectrum.
.jpg)
The illustration above gives an idea of the relative "colors" of various light sources, from tungsten lighting (more red) at low temperatures to the blue sky which has a high color temperature (more blue). Also shown is the color of the filter required to "compensate" for the color of the light source to produce correct color.
In the old days when everyone shot film, film came in two types. One gave more or less correct colors in daylight and the other (less common) gave more or less correct colors in tungsten light. If you had daylight film and wanted to shoot under tungsten lighting you had to add a filter. Since tungsten light contains more red than daylight, you needed a filter that absorbed red, which means a blue filter - like the one below:
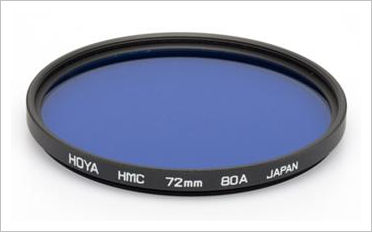
An 80A filter used to shoot under tungsten lighting on daylight film
White balance is basically the digital equivalent of such filters. The various White Balance settings available on most cameras are effectively "presets" of various color temperatures, much like the push buttons on a car radio are preset to certain radio frequencies. The table below shows the white balance options for the Canon EOS 7D camera and how they correspond to color temperature. Sometimes the "fluorescent" setting may not fully correspond to a simple 4000K color temperature. Some fluorescent lights have a green "spike" in their output and to balance that a "fluorescent" setting may have a slight magenta bias (magenta being the complementary color to green). This will depend on the camera and the exact white balance parameters used for any "fluorescent" preset.

How does Auto White Balance Work?
How can the camera tell what white balance to use when set to "auto white balance"? Well, there are a number of answers. Most DSLRs use a combination of two different methods:
- They "scramble" all the colors in an image and assume that the result should be neutral (i.e. some shade of grey).
- They look for the brightest object in the image and assume that it should be white
Obviously, as Canon acknowledge, there can be errors. If everything in the image is some shade of red, neither of the above methods for determining AWB is going to work very well. By incorporating various checks and balances (e.g. limiting color temperatures to a certain range) AWB rarely if ever goes totally crazy.
Some cameras also have additional sensors designed to measure white balance. In fact the Original EOS 1D had an external sensor who's only job was to measure the color temperature of light falling on it. Since it measured incident light and not light reflected from a subject, it didn't matter what color the sensor was seeing. Various Olympus models (E-1, E-3, E-30 for example) also have an external AWB sensor. Normally the external sensor works in conjunction with an analysis of the image to determine AWB.
Many cameras have an AWB algorithm that makes images shot under tungsten light look warmer than a truly accurate WB would give. This can either be cause the tungsten light has a cooler color temperature than the AWB range allows or it can be that some camera makers think that people prefer a warmer color balance on indoor shots.
What if the light source isn't a black body radiator?
This is where there can be problems, and when custom white balance can come to the rescue. Most white balance settings assume that the incident light follows some sort of smooth black body type curve. For hot radiators (tungsten filaments, the sun) this is close to being true. However there are light sources (lasers, LEDs, Fluorescent tubes, Neon lights) that are not black body radiators. They have what is called a line spectrum or discontinuous spectrum. While lamp makers try their hardest to make light sources like LEDs or Fluorescent tubes emulate continuous black body sources, they can't do it perfectly. Below is the spectrum of a "white" fluorescent tube compared with what you might typically expect from a tungsten lamp.
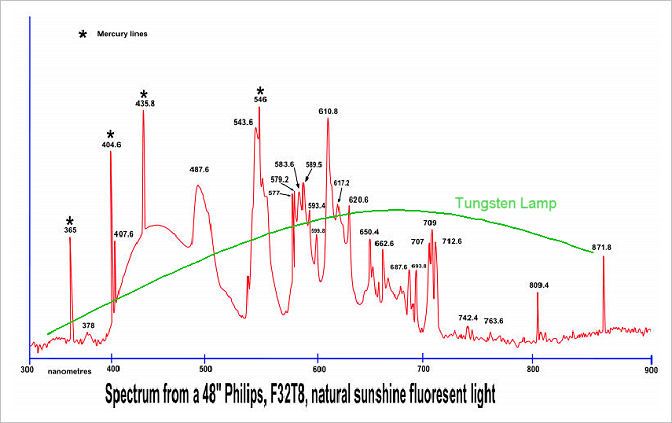
As you can see, it's not a perfect match! The fluorescent light source spectrum has many ups and downs, plus a number of sharp discrete lines which come from the gas discharge inside the tube. The less sharp features are the result of the fluorescence of phosphors used inside the tube to emulate a continuous spectrum.
Actually, despite the spiky non-blackbody nature of the fluorescent light spectrum, you can still get a decent white balance with color temperature or other present WB settings. This is because, averaged out, it has around the same amount of emission in the red, the blue and the green regions of the spectrum.
Where you run into more trouble is when the light spectrum doesn't look anything like a black body spectrum. For example if you put a green filter over your lights (don't ask why, this is just an experiment!). A black body never looks green. For example there are no green stars and no matter what temperature you heat an iron bar to, it will never look green. The reason for this is that if a black body is emitting a lot of green light, it will also be emitting a lot of red light and a lot of blue light and Red+Blue+Green = white, so it will look white, not green. If you cool it down more it will look red and if you could heat it up enough it would look blue (though iron and any other substance would melt and vaporize before it really looked blue).
Custom White Balance
A custom white balance is usually set by filling the frame with a neutral taget and shooting an image. That image is them used by the camera to create a custom white balance.
Below is a shot of a grey card taken under green light and various attempts to color correct it using preset and Kelvin white balance. They all fail. Only the custom white balance works

Black body temperature (K) white balance doesn't work with green light illuminating the subject. Custom WB does
Why does the custom white balance work? Because it isn't a black body temperature setting. What it does is look at an image that you have told it is neutral (white or grey). It looks at the colors in the three color channels (red, green and blue) and figures out what it has to do to make them all equal. For example if the grey card image had 6x as much green as blue and 3x as much green as red (e.g 60G, 20R, 10B), then it would divide the green signal by 3 and multiply the blue signal by 2 so that all three channels would have the same value (20G, 20R, 20B) and the image would appear neutral (grey) and have a "correct" color balance.
What's a Neutral target

Everything on the strip above is a neutral "color"
A neutral target is one that reflects every color equally. Basically anything from white to black (though technically black doesn't reflect anything, so you really want a white to mid grey target). How do you find a neutral target? Well, if you want something that's supposed to be scientifically calibrated and certified to be neutral, you buy one!
Foe setting white balance it doesn't matter if your target is white or grey. You may have heard of an 18% grey card which can be used for setting exposure. It's also fine as a neutral target. However for white balance it doesn't have to be 18% grey. It can be 5% grey or 12% grey or 18% grey or 25% grey or it can be white. Makes no difference when used as a white balance target. Now you might think that white is white, so you could just use a white sheet of paper as a neutral target. Well, you'd be both right and wrong. If it really was just a white sheet of paper you'd be OK. A white target would diffusely reflect 100% of the light falling on it. While you never get 100% diffuse reflectance, that doesn't matter. It could reflect 92% of the light falling on it as long as that was 92% of the blue light, 92% of the green light and 92% of the red light that makes up "white" light. However some white paper (especially premium printing paper) contains a fluorescent whitener. This absorbs UV light and re-radiates it as blue light. A little bit of additional blue makes the paper look brighter and "whiter" than white. It results is a reflection spectrum that contains relatively too much blue and so if it's used to set a custom white balance it will result in a color temperature that's a little too high. Is the effect a big one? Generally not. For most purposes a sheet of plain white copy paper makes a pretty good target for custom white balance setting.
While the normal way of setting a custom white balance is to shoot a neutral toned target under the same lighting as will be used for future shots, there is another way to do it. Instead of using the light reflected from the target, you can measure the light falling onto the target. If you put a diffuser over the lens and then point the lens AT the light source you'll get an image that can be used just as well as the shot of light reflected from a neutral target. Anything that diffuses light without changing its color will work. Again you can buy a diffuser made for this purpose. Some can also be used convert your camera into an incident light meter.
If you want to go the "do it yourself" route, you can use one of two basket type white coffee filters over the lens. Not calibrated of course, but cheap and good enough for most purposes.
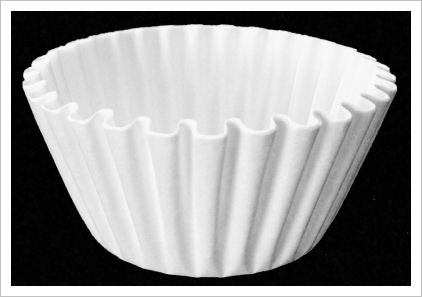
White basket coffee filter. Placed over the lens makes a decent DIY white balance transmission filter
How do you white balance mixed lighting?
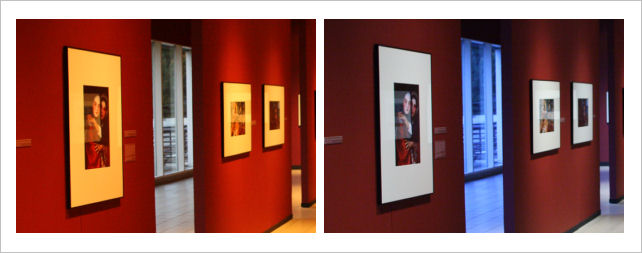
Left: White Balanced for outdoor light Right: White balanced for indoor light
Generally you can't. If the whole scene was uniformly illuminated by mixed lighting (e.g. a tungsten and a fluorescent bulb mounted side by side in a soft box), then you could use custom white balance. However if you have different parts of the subject illuminated by different light sources (e.g. flash and tungsten bulbs, or daylight from a window and tungsten light from a room light), then you can't white balance so that all colors will look correct. You have to pick what part of the image you want to have a neutral color balance and do a custom white balance from a grey/white card in that part of the scene. After that, if you want uniform neutral color correction, you have to do it by masking and color tweaking in an image editor.
So that's pretty much White Balance 101. There are more advanced courses, but I think this article tells you pretty much all you need to know to understand and use the white balance settings on your camera.
