Echo SNR Measurement
Quick Start Guide — EMETest
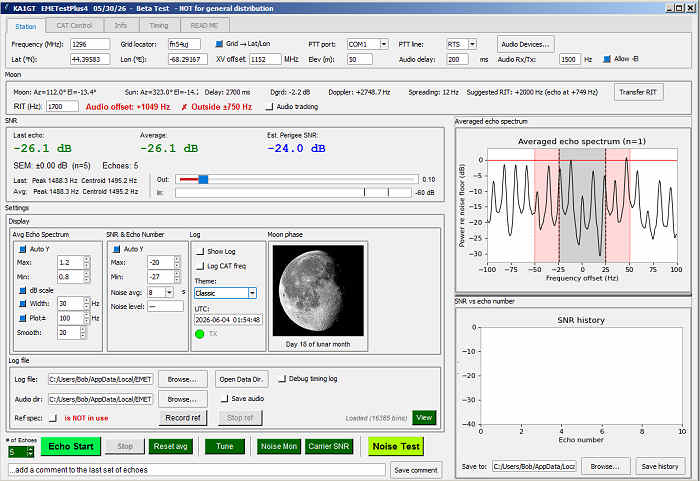
This guide takes you from a freshly opened EMETest window to your first measured echo SNR. Read it once before operating; most settings need to be entered only once and are saved automatically.
Before You Start
Confirm the following before launching EMETest:
- The Moon is above your horizon (EMETest will warn you, but check in advance).
- Your antenna is pointed at the Moon and your tracking software is running.
- WSJT-X is not using your CAT port, or its rig is set to None.
- All AGC and DSP noise-reduction functions on the radio are disabled. A noise blanker is acceptable.
- Your sequencer is connected and tested.
Step-by-Step Setup
Station Tab — location and frequency
In the Station tab at the top of the window, enter your
Maidenhead grid locator (e.g. FN42) and verify that the latitude
and longitude fields update automatically. Enter your operating frequency in MHz
(e.g. 1296.100). If you use a transverter, enter the IF offset in
the XV offset field so that CAT frequency commands are correct.
Set your elevation above sea level in metres.
PTT Configuration
Select your PTT serial port from the PTT port drop-down and choose RTS or DTR to match your interface. If you will use CAT PTT instead, skip this field and configure the CAT tab (Step 4).
Set the Audio delay value. This is the time between the PTT signal going active and the first audio sample being transmitted. A value of 200 ms is a safe default; reduce it only if you have measured the actual delay on your PC. The delay cannot be zero — some intrinsic audio pipeline latency is always present.
Audio Devices
Click Audio Devices… and select your sound card input and output from the drop-down lists. If you have only one sound card, leave both set to System Default.
Set the Audio Rx/Tx frequency. This is the audio tone frequency used both for transmitting and for locating the echo in the received audio. The default of 1500 Hz works well for most stations and is the same default used by WSJT-X.
CAT Control (optional but recommended)
In the CAT Control tab, select your rig model, port, and baud rate, then click CAT Connect. Once connected, you can enable Doppler shift RX to have the program automatically command the radio to track the Doppler-shifted echo frequency (similar to WSJT-X's “Fake It” mode), and enable PTT via CAT to use the CAT connection for transmitter keying instead of the serial RTS/DTR line.
Icom radios require the correct CI-V address in hexadecimal.
Doppler Correction — Audio Tracking
Check the Moon information bar. The current Doppler shift and a suggested RIT setting are displayed there. For most stations the simplest approach is audio tracking:
- If the Doppler shift is within approximately ±750 Hz, enable Audio tracking in the Moon bar. The program will automatically adjust its echo analysis window to follow the Doppler-shifted echo without touching the radio frequency.
- If the Doppler is outside that range, use your radio's RIT to bring the echo into the ±750 Hz window, then enable audio tracking. The Transfer RIT button copies the program's recommended RIT value into the RIT entry box; you must also set the same value manually on your radio.
Set Audio Levels
Click Tune to transmit a continuous 1500 Hz tone without starting a measurement sequence. Adjust your PC output volume and radio drive until you reach the desired RF output. Start low and increase gradually. While tuning, watch the input level meter:
- Green — good level.
- Yellow — level is high; reduce PC microphone gain or radio RF gain.
- Red — clipping; reduce immediately.
Click Stop when done.
Start the Echo Sequence
Click Echo Start. The program will transmit the tone for a period calculated from the current moon distance, then switch to receive and listen for the echo. The cycle repeats automatically.
After the first echo, the four SNR readouts in the SNR panel update:
- Last echo — SNR of the most recent single echo.
- Running average — power-domain accumulation of all echoes since the last reset.
- SEM — standard error of the mean of individual echo SNRs.
- Perigee equiv — the running average corrected to what the SNR would be if the Moon were at perigee distance.
The averaged echo spectrum plot updates after each echo. Click Reset avg to restart the accumulation without stopping the sequence.
Stop and Review
Click Echo Stop to end the sequence. If Save audio was checked, each echo has been saved as a WAV file in a dated subdirectory. These files can be reprocessed at any time with the EME Batch SNR Analyser.
Troubleshooting
| Symptom | Check |
|---|---|
| No echo heard or measured | Verify PTT is working (radio goes to TX), Moon is above horizon, antenna is pointing at the Moon, tracking is active, audio tracking or CAT Doppler correction is enabled. |
| Very low SNR (<−30 dB) | Normal for weak signals. Run more echoes to build up the averaged SNR. Check that the echo audio frequency is correct — enable audio tracking if unsure. |
| CAT not responding | Check port, baud rate, rig model, CI-V address (Icom). Ensure no other program (WSJT-X, logging software) holds the CAT port. |
| Input level meter always zero | Wrong audio input device selected, or PC microphone level is at zero. |
| REC label not visible | Check the Save audio checkbox in the controls area. |
Understanding the SNR Values
All SNR values are quoted relative to a 2500 Hz noise bandwidth. A result of −20 dB means the echo signal power is 100 times weaker than the noise power in that bandwidth. Typical results at 1296 MHz with a 3-metre dish are in the range −15 to −25 dB. The running average improves as more echoes accumulate, approaching the theoretical integration gain of roughly 5 dB per decade of echoes. The perigee equivalent corrects for moon distance so that results from different sessions can be compared directly.