
Depth of Field in Depth
So exactly what is depth of field? Well, in any photograph there will be a range of distances over which objects appear to be in sharp focus. This range of distances is called the "depth of field". The important word in that sentence is "appear". Strictly speaking, a perfect lens produces sharp images on the film or image sensor (with the sharpness limited only by diffraction) of points which lie in a plane at some distance from the lens. Images of any point either in front of or behind that plane will be less sharp, and the farther away the points are from the plane, the less sharp they will be.
Points in the plane will be imaged as diffraction limited spots which can be as small as a few thousandths of a mm in diameter. Points focused outside the plane will be imaged as small circles, whose diameters grow as the points move further away from the plane in focus. These small circles are referred to as "circles of confusion". If the circles of confusion are small, then the image made up of them will appear sharp, but as they grow larger the image becomes "fuzzy".

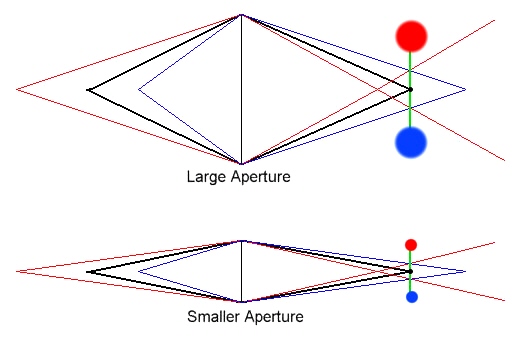
In the diagrams above the black lines represent light rays from a subject that is in focus. Light is focused onto the focal plane of the camera (shown in green) aa a very small spot. The red lines represent a point that's further from the lens. Light rays from this point come to a focus in front of the focal plane, and by the time they intersect the focal plane they've diverged to form a larger spot who's size is defined by how far apart the red lines are when they cross the green focal plane. This larger spot is shown in red.
The blue lines represent light from a point closer to the lens. These lines cross (focus) at a point that's behind the focal plane. When they cross the (green) focal plane they form a spot who's size is defined by how far apart they are when they cross, and this is shown by the size of the blue spot.
If the spots are smaller than the circle of confusion value, we can say that the red and blue rays come from points within the depth of field of the lens. It should be evident from the figure that the size of spots formed by the red and blue rays are smaller in the lower figure (representing a smaller aperture) than in the upper figure (representing a larger aperture). Thus in the upper figure with the larger aperture the red and blue points may lie outside the DOF, but in the lower figure they may lie inside. This illustrates why why stopping down gives you a greater depth of field.
Circles Of Confusion
The question is then, how large can the circles of confusion get before in image is no longer seen as sharp? That depends on a number of factors including how much the image on the film is enlarged before viewing, what distance it is viewed from and what your subjective opinion of sharp is. If we assume that the closest distance at which most people have sharp vision is about 10" and that at that distance an average person might be able to see points spaced as closely as 5 points/mm, then we can allow the circles of confusion in an image to be as large as 1/5mm (0.2mm) with a reasonable hope that the image will still appear sharp. If we are looking at an 8x12 (or 8x10) print from a 35mm slide, the image on the slide has to be enlarged by a factor of 8, thus the circle of confusion in the slide itself must be 8 times smaller than that in the print, i.e. 1/40mm (0.025mm) in this case.
If we wanted to look at a 16x24 print from a distance to 10", the circles of confusion in the slide could be no bigger than 1/80mm (0.0125mm), conversely if we wanted to look at the 8x10 image from a distance of 20", we could allow the circles of confusion to be as large as 1/20mm (0.05mm) in the original slide. This should make it clear that the value of the circle of confusion required for a sharp image is not a fixed quantity, but varies depending on the degree of enlargement of the negative or slide and how it will be viewed. For 35mm work a value of between 0.025mm and 0.035mm is often chosen, representing a value based on close viewing of an 8x10 print. For medium or large format work a larger circle of confusion is permissible, since the negatives or slides don't have to be enlarged as much as those from 35mm equipment to make a print of a given size.
Diffraction and the Circle of Confusion
There's an important point to consider when thinking about the circle of confusion size and that is the effect of diffraction. The diameter of a perfectly focused point using a "perfect" lens is a function of aperture. At f2 the point size can be as small as 2.7 microns 0.0027mm), while at f22 the smallest point size possible is 30 microns (0.030mm) and at f32 it's 43 microns (0.043mm). [Note these numbers are approximate and depend of the wavelength of light being used, but they are accurate enough for photographic purposes].
If you chose to use a circle of confusion of, let's say, 30 microns (0.030mm) for your depth of field calculations and you calculate the extent of the depth of field at f32, the calculation becomes somewhat meaningless since your spot size will always be larger than your chosen value for the circle of confusion. If your definition of the size of the circle of confusion is that it represents the largest spot size that will give you acceptable sharpness, then this means that at f32, nothing will be acceptably sharp! You can read more on this topic in my article on diffraction and how it affects image sharpness.
Hyperfocal Distance
If we focus a lens at infinity, objects at closer distance within the depth of field will also look sharp. The distance at which the closest object still looks sharp is called the hyperfocal distance. In this situation, depth of field "beyond infinity" is wasted. If instead of focusing the lens at infinity, we focus it at the hyperfocal distance, the depth of field will now extend from 1/2 the hyperfocal distance to infinity, so we have now maximized our utilization of the available depth of field. The hyperfocal distance is related to the focal length of the lens, the f-stop in use and, you guessed it, the allowable diameter of the circle of confusion! The three are related as follows:
Hyperfocal distance = (Focal Length)2/(f-stop x cof)
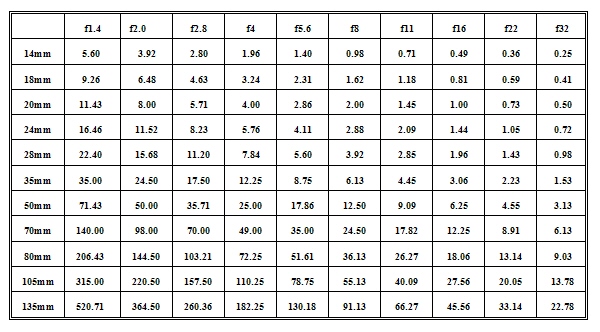
where cof is the diameter of the circle of confusion and all the measurements are in the same units (usually mm). In the past, most lens manufacturers included depth of field scales on their lenses, often based on a value of 0.035mm for the circle of confusion. While this value may be OK for casual work, the value of 0.025mm is better for critical use. Table 1 gives the value of the hyperfocal distance (in meters) for common focal lengths and apertures based on this, 0.025mm, value.

So looking at the table for a 24mm and f8 we see the hyperfocal distance is 2.88m. That means if we focus at a distance of 2.88m, the depth of field will extend from 1.44m to infinity.
DOF and Magnification
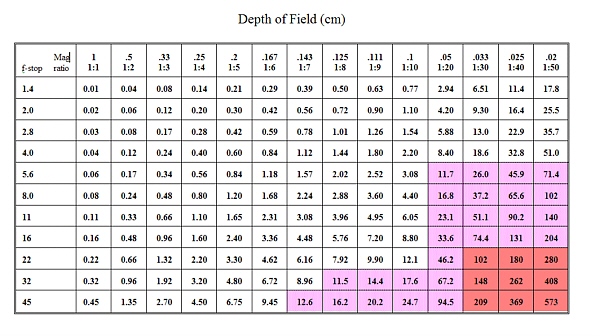
Hyperfocal distance focusing is used mostly by landscape photographers who want pictures with everything in focus, from nearby flowers to distant mountains. However, hyperfocal distance calculations are not much use to wildlife photographers who just want to get the entire head of an animal in sharp focus when it is only a few feet away! They need to know what aperture to use and where to focus to get everything from say, 1.9m to 2.1m in "sharp" focus. Well, it turns out for relatively close up work the depth of field extends about (though not always exactly) equally in front of and behind the point in focus. Furthermore, the depth of field is fixed by the magnification ratio and the aperture, and doubling the f-stop (e.g. from f8 to f16) doubles the depth of field. Table 2 shows the total depth of field (in cm) for various apertures and magnification ratios from 1:1 (life size) to 1:50 (1/50th life size).
For a 50mm or longer focal length lens, the numbers in the unshaded boxes represent a region in which the depth of field behind the plane in focus is no more than 25% greater than the depth of field in front. Numbers in the unshaded area plus the lightly magenta shaded area represents the same region for a 200mm or longer lens, and the whole table is valid for a 500mm and longer lenses.

The formula used to generate these numbers is:
Total Depth of field = 2 * cof * f-stop x (m+1)/(m2)
where cof is the diameter of the circle of confusion (0.025mm was used for the table) and m is the magnification (life size = 1, 1/50 life size = 0.02). If you use mm for cof, the answer will also be in mm. Note that this formula is an approximation, but is very good in the 1:1 to 1:10 range., There is a more complex exact solution, but for practical purposes, even at 1:50, the approximation is more than adequate for lenses of 200mm or more.
Thus it doesn't matter whether you use a 50mm macro lens or a 200mm macro lens for a 1:1 shot. The depth of field is exactly the same in both cases (but you have less working distance and a different background with the 50mm lens of course), and extends equally in front of and behind the plane of focus. As the magnification drops, to say 1:10, the total depth of field of both lenses remains equal, but it is no longer equally distributed in front of and behind the plane of focus. While both lenses will show slightly more depth of field behind the plane of focus than in front of it, the shorter focal length lens shows this shift to a greater extent. For example, at f16 and a 1:10 magnification ratio, the 50mm lens has 17% more depth of field behind the plane of focus than in front of it, while the 200mm lens has only 4% more. At 1:50 these numbers become 233% for the 50mm lens, but only 22% for the 200mm lens. At larger aperture the shift is less pronounced, for example at 1:50 and f5.6 the numbers are 32% for the 50mm lens and only 7% for the 200mm. Thus for wildlife photographers using large aperture telephoto lenses for close up shots, it's usually a pretty good approximation to assume equal depth of field in front of and behind the plane of focus.
Near and Far Points in Focus
So, if depth of field extends from infinity to 1/2 the hyperfocal distance at one extreme, and is distributed equally about the plane of focus at the other extreme, what happens in between? Well, as the plane in focus becomes more distant, the depth of field grows more rapidly behind the point in focus than it does in front of it. Thus you will see general statements made, like "depth of field extends 2 times more behind the focused distance than it does in front of it". Such statements are a gross generalization and are somewhat misleading since they are true only for a particular lens at a particular aperture focused at a particular distance. For example a 50mm lens at f11 focused at 3m has about twice as much depth of field (1.4m) behind the lens as in front of it (0.7m). However a different focal length lens focused at the same distance, or the same lens at a different aperture will give a very different ratio of depth of field behind and in front of the lens. You can actually use the hyperfocal distance we calculated earlier to calculate the near and far points in acceptable focus with the following expressions:
Near Point in focus = (D x H2)/(H+D-F)
Far point in focus = (D x H2)/(H+F-D) (if this expression is negative, then infinity is the far point in focus)
Where H is the hyperfocal distance
D is the distance at which the lens is focused
and F is the focal length of the lens
(of course H, D and F must be expressed in the same units)
You could use this formula to calculate depth of field in the macro region too, but the difficulty is in defining D. Do you measure the distance to the film plane, to the front of the lens or to somewhere in between? The answer is usually "somewhere in between", but that's another (and a complex) story. As you can see, it's much easier to use magnification when the subject being photographed is close to the lens. When the subject is distant, errors due to uncertainty in exactly where to measure to become insignificant. The distance D, for a magnification m is actually given by:
D = [(1/m) + 1 ] x (focal length)
and if you measure D from the subject to somewhere in the middle of your lens, you usually won't be too far wrong. Thus at 1:1 with a 50mm lens you will be about 100mm from your subject, and at 0.1 (1:10 or 1/10 life size) you will be about 550mm or 55cm away.
Armed with these expressions and tables you can now predict depth of field under any set of circumstances. If you are fortunate enough to have a lens which itself has a clearly marked depth of field scale on it you might like to compare it's predictions with your calculations. Some lenses have markings based on a 0.035mm circle of confusion, which many critical photographers feel is too large. The use of a 0.025mm circle of confusion means that for any given lens setting, you need to stop down 1 stop more than depth of field markings based on 0.035mm would suggest. Many lens makers are leaving depth of field marking off their new lenses, so you may need to carry around tables like those presented here if you are concerned about depth of field. Even cameras with automatic "depth of field" modes, like the Canon EOS series only approximate the correct lens settings, so you might want to check the camera's suggestions against those you calculate for yourself!
Important Notes on DOF
(1) One thing to remember about sharpness at the limits of the depth of field is that by the very definitions used, objects at the limits will be at the limit of "acceptably sharp". Sometimes this might not be sharp enough. If you want to make sure that distant objects (e.g. mountains) are really sharp, focusing at the hyperfocal distance might not be good enough. Before depending on DOF calculations for important shots, I'd strongly advise doing your own testing. You have to see what looks sharp to you when viewed in the way you view the images and when taken with the lenses that you use on the film of your choice. Calculated DOF is a good guide and a good place to start, but only you can decide if your images meet your requirements for sharpness. For example you might want to trade off increased sharpness at "infinity" for slightly less sharpness close up if you are taking a landscape shot where the distant scenery needs to be as sharp as possible. In that case you would focus at a distance somewhat greater than the hyperfocal distance that a "normal" DOF calculation would suggest.
(2) All of the above calculations are based on what is called "geometric optics", which makes the assumption that light travels only in straight lines and can be focused to an infinitely small point, i.e. that diffraction does not exist. The use of geometric optics can be justified because DOF calculations are only an approximation anyway, based on subjective definitions of things like "acceptably sharp". If you really want to do detailed analysis of DOF, you need to use a more advanced optical theory and calculated things like the MTF (modulation transfer function) of the defocused image. This is too complex to deal with in any simple way, so I haven't even tried to deal with it here. My web page http://bobatkins.com/photography/technical/dofdiff.html presents some results from the use of the more complex theory. The simple geometric optics approach usually tends to be a bit optimistic in its predictions.
(3) Depth of field is a fuzzy concept depending on subjective definitions of sharpness. In practice approximations are just as useful as precise calculation.
A Simple DOF Calculator
Here's a very simple Depth of Field calculator. It doesn't check if diffraction comes into play because of a small aperture and it makes some approximations, but it's generally quite accurate. For more information, including calculation of just how out of focus any out of focus areas will be, see these articles and the associated downloadable calculators.
- Detailed depth of field calculator
- Depth of field and Background Blur calculator
- Digital Depth of field - how sensor size affects DOF
